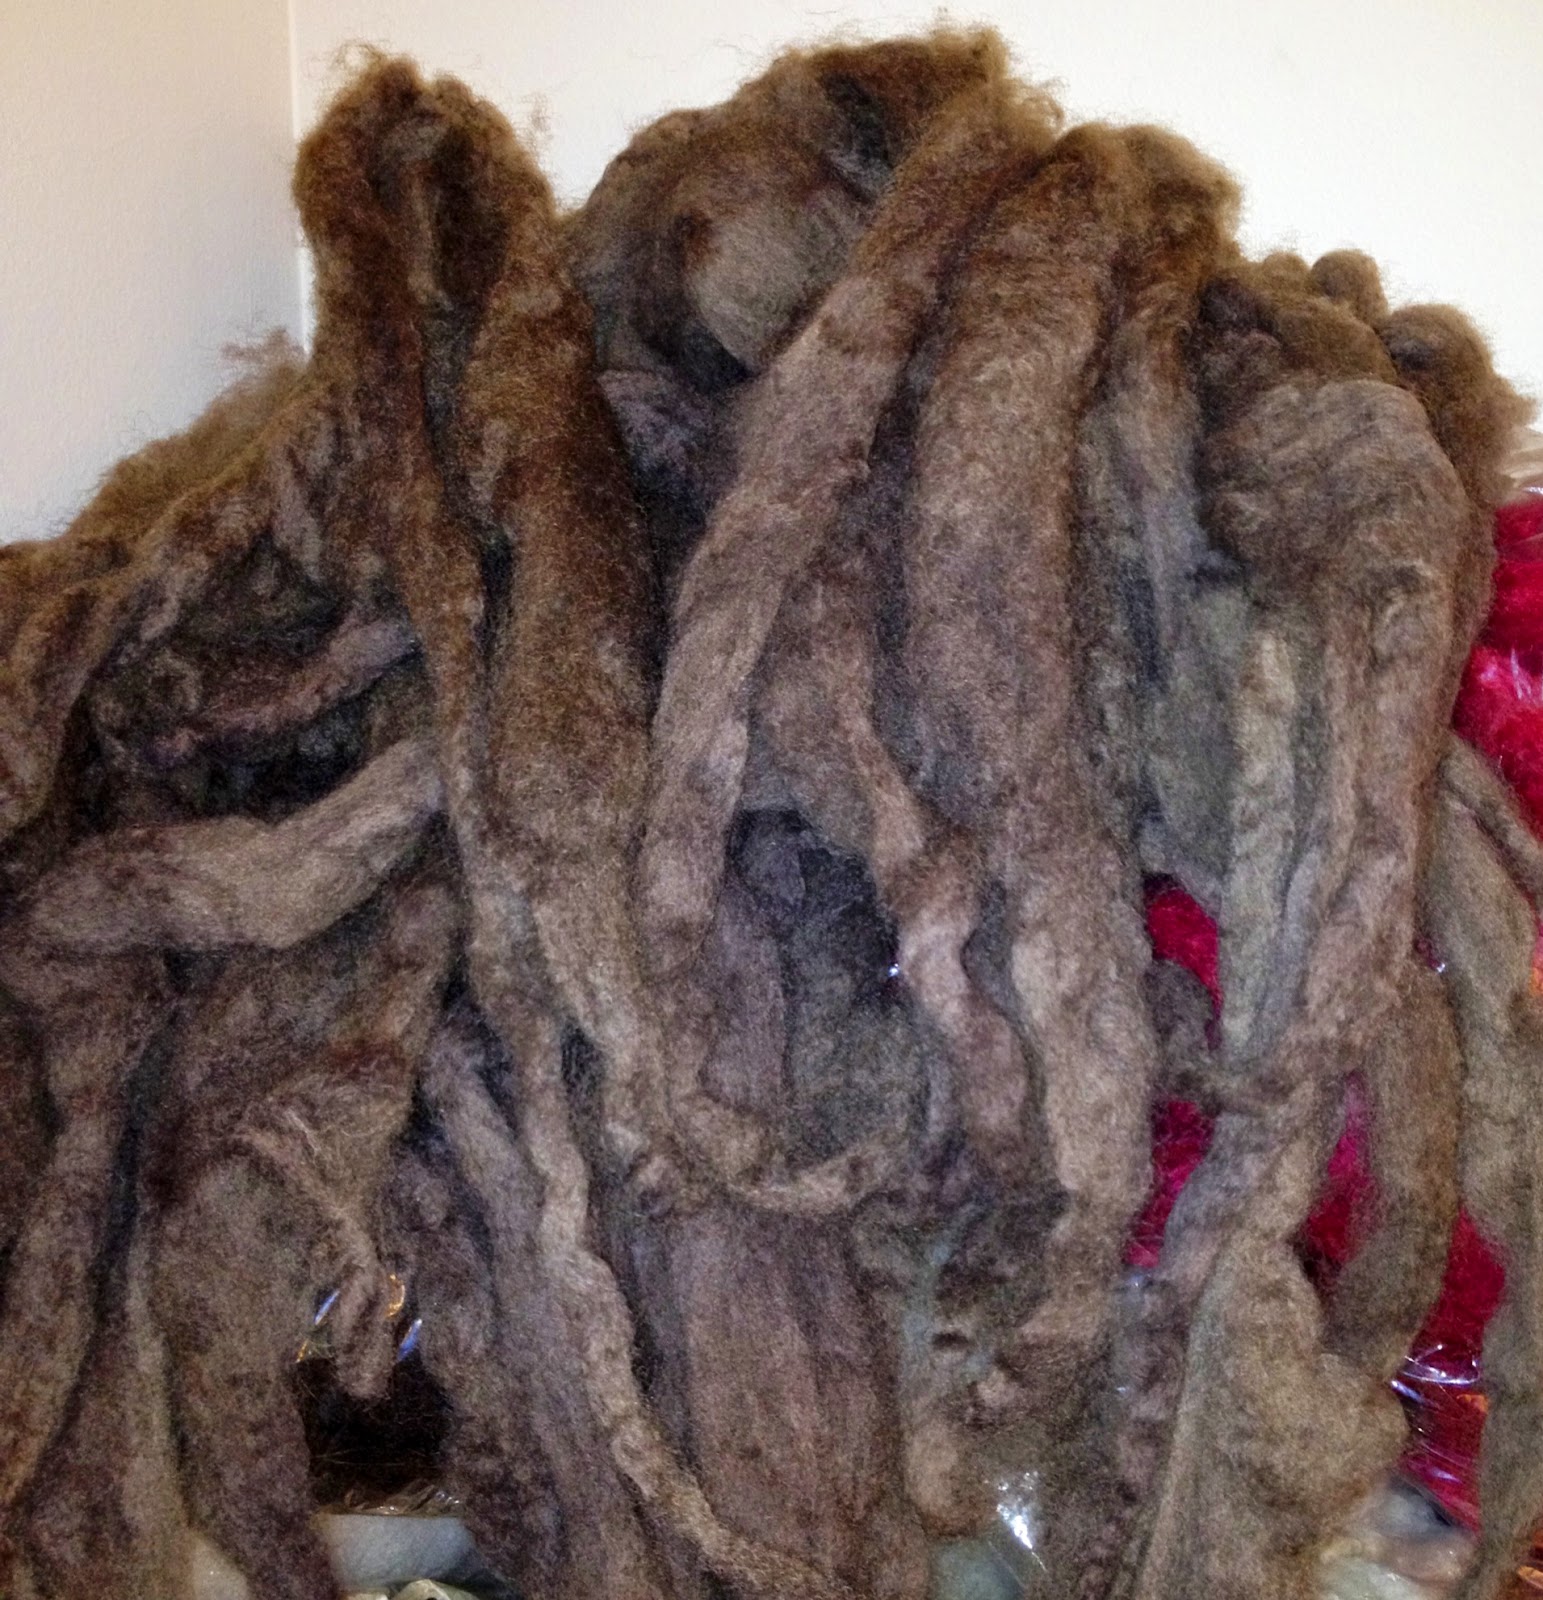
Today I have been working with a beautiful Icelandic fleece I got at the Maryland Sheep and Wool Festival. I didn't get it at the fleece sale - if there had been any Icelandic there, they were gone by the time I was looking for them. I bought mine at the Icelandic Breeders booth. There were several fleeces there and I looked at possibly all of them until I found one that really caught my eye.
The one that caught my eye wasn't as large as most of the others, and it cost less per pound than the others. It was white with small brown patches throughout, but what really caught my eye was that the thel (the softer part of the dual coat) looked exceptionally soft and wonderful. The woman I talked to, to ask about it happened to own the farm from which this fleece came. She explained that it cost less per pound than the others because it wasn't skirted. She sounded apologetic about this, but it didn't bother me. I had pawed through the bag and was satisfied that it wasn't exceptionally dirty - in fact I found it a little hard to believe that it hadn't been skirted. When I said I would like to buy it she asked if I had seen that it was spotted, and I said yes. She seemed apologetic about that, too. I don't know why, because I came out of that booth thinking that I had gotten by far the best fleece of the bunch. And I still think that.
I've been separating tog (the longer, courser part of the dual coat) from thel today and am looking forward to the day when I can spin the different fibers up. I am really wanting a loom now because I would dearly love to weave this up into a shawl or a small blanket, using the tog as warp and the thel as weft.
I have the contact information for the farm and when I am finished processing this fleece I want to contact the woman and let her know how special this fleece has been. For some reason, I don't think she realized what a gem this fleece was and I want to make sure she knows how much pleasure it's giving me to work with it.
Thursday, May 28, 2015
Monday, May 4, 2015
Maryland Sheep and Wool Festival 2015
I had a great time at the 2015 Maryland Sheep and Wool Festival over the past weekend. I scored some really lovely fleeces, saw lots of sheep, bought lots of fiber and fiber-related things, took a class with the lovely Maggie Casey, got to be in the same room as said Maggie Casey and Judith MacKenzie at the same time, and watched part of the sheep-to-shawl competition.
This is a gorgeous mutlti-colored Icelandic fleece that I got at the Icelandic Sheep Breeder's booth. It is just so lovely and I can't wait to start processing it:

This is a very lovely Romeldale x Rambouillet fleece I got. A note tucked in with the fleece said that the owner's sheep hadn't been coated this year because they were hired by Apple to graze under their solar panels to keep the grass shorn instead of using lawn mowers (the coats snag on the panels). It's so nice when a little information is included with the fleece:

I also got a very lovely California Red fleece, and a very lovely Finn x BFL fleece. I'm excited about all of my fleeces this year and can't wait to see what types of yarns they will produce.
As I mentioned, I watched part of the sheep-to-shawl competition. It started at 8:00 AM with the shearing of the sheep and ended at about noon with the judging of the finished and washed shawls. The shawls were auctioned off after the completion. Here are some pictures of the teams, they all had themes, the most notable of which was the OZ team. In some of the pictures you can see the freshly-shorn fleeces that the teams are carding, spinning, and weaving into their shawls:


And last but not least, here is a picture of a little Barbados Blackbelly lamb. I love walking through the barns with the sheep pens, there are so many different breeds all in one place. The Barbados Blackbellies were very distinctive and are prized for their lean and mild-tasting meat. They are a hair breed, meaning that they don't produce wool. Their hair is very stiff, almost like a bristle-brush - at least the mother of this little lamb felt like that when I petted her:

My California Red fleece actually has some Barbados Blackbelly in it! California Reds resulted in a cross of Tunis sheep and Barbados Blackbelly. I got a really nice fleece, I think it was the softest of the handful of California Reds there were to choose from. I'm looking forward to working with this wool - I love trying out new breeds and crosses that I haven't had a chance to work with before.
I am busy washing fleeces now, along with all of my other woolly and fiber pursuits.
Wednesday, April 15, 2015
Using Tow Flax
When processing flax, most of it becomes tow flax - the shorter fibers that stay behind in the hackles when hackling the flax. So you have a lot of this shorter stuff, much of which is quite nice.
Lately, I've been hankering to use my tow flax and have been experimenting with blends. I made a small sample blend of flax, cotton and silk. I carded the fibers and spun it up into a few yards and then knitted a small swatch. It was very nice, but a cat found it during the night and took it off somewhere, probably the basement to its hidey-hole, so I don't have any pictures of that swatch.
I really liked the linen/cotton/silk blend, but decided I wanted to stick to all-plant-based fibers for a project I have in mind. So I tracked down some ramie, which is a bast fiber gotten from a type of nettle. I used my hand cards to make a small sample of a roughly 33/33/33 blend of flax, cotton and ramie. I spun the blend up into a few yards of a 3-ply yarn.
Below you can see the materials and the resultant swatch (click on the pictures to see them larger):
 |
| Tow flax, cotton, ramie, and the blend in a knitted swatch. |
And here is a closer look at the swatch:
 |
| Linen, cotton, ramie blend, approx. 33/33/33. |
The linen/cotton/ramie is also a very nice blend. The project I have in mind for it is the Leksak Lady, found on Ravelry. The pattern calls for worsted weight, which I think would be a bit heavy in this blend, so I'm hoping I can successfully alter the pattern for a thinner gauge of yarn. If not, then I'll search for another suitable pattern for this yarn.
I'm planning on dyeing the yarn with natural dyes, possibly goldenrod or tesu or onion skins for a nice golden yellow color.
Anyway, that's how I'm hoping to use the tow flax I have on hand right now. The resulting yarn should be comfy and breathable.
Saturday, March 28, 2015
Where I bought my flax seeds for 2015
When I first started growing flax, I bought my flax-for-linen seeds from The Hermitage. They sell Marylin variety of seeds from the Netherlands, which is one of the main varieties for linen flax. The only problem I had was that the seed came coated in nasty chemicals meant to prohibit diseases that flax is prone to.
I didn't really like that idea, so I saved my seeds from one year's crop to plant the next year. This worked well, but I didn't produce quite enough seed last year to plant my regular amount. I searched for a source of fiber flax seed that was uncoated. It was hard to find, but I did find a source of uncoated Marylin flax seed. The original source of the seed is again the Netherlands, but the shop from which I bought the seed is in the U.K. The shop is Wild Fibres. Click HERE for the link to their flax seed page.

I have about 5 ounces of my own seed saved, plus 8 ounces from Wild Fibers. I'm very happy and can't wait for planting time. I usually plant 8 ounces, so I should have plenty for this year.
I didn't really like that idea, so I saved my seeds from one year's crop to plant the next year. This worked well, but I didn't produce quite enough seed last year to plant my regular amount. I searched for a source of fiber flax seed that was uncoated. It was hard to find, but I did find a source of uncoated Marylin flax seed. The original source of the seed is again the Netherlands, but the shop from which I bought the seed is in the U.K. The shop is Wild Fibres. Click HERE for the link to their flax seed page.
I have about 5 ounces of my own seed saved, plus 8 ounces from Wild Fibers. I'm very happy and can't wait for planting time. I usually plant 8 ounces, so I should have plenty for this year.
Sunday, March 22, 2015
Last year's flax crop is finally ready to spin!
I finally got all of my 2014 flax crop broken, scutched and hackled. I was late in planting last year, and therefore late in harvesting and late in getting the crop retted. By the time the flax was dry from retting, I only had a small amount of time to start the rest of the processing before winter weather set in. Now that spring has sprung and the snow has finally melted, I've been outside finishing what should have been done last fall. Now I''m hoping to get it spun up before gardening starts in earnest.

My 2013 crop yielded 7.2 ounces and about 800 yards of fine, two-ply linen yarn. I'm hoping to get around 500 yards from the 2014 crop. Cross your fingers!
Friday, March 6, 2015
The lucet, old tech meets new tech
Our library has acquired a 3-D printer. They held a class the other day on how to design things and submit them to the printer. Printed items cost 10 cents per gram, which is very reasonable because the filament used in the printing is very light. There were items on display, one of which was a recorder (the musical instrument). It weighed 18 grams and I estimated that this would be similar to a printed drop spindle, so the cost would be about $1.80 for something like a printed drop spindle. The item that we ended up printing from the class that day was free, however.
I didn't end up printing a drop spindle because I thought it would have to be printed out in two pieces, so I decided on a lucet, which is a tool from medieval time used for making decorative cordage to put on clothing, etc.
I tried designing one, but didn't really have the time (the class was only an hour long, most of which was taken up with learning how to use Tinkercad, the design program). So instead I went to a recommended site (thingiverse.com) and found an already-made design for a lucet. I scaled it to what I thought was about 6 inches by 3 inches, but when it printed out it was half those dimensions. Don't know why exactly, but it actually works really well with some of my handspun silk, which is really fine.
So here is my lucet with the silk cord I'm making with some of my naturally-dyed, handspun silk:

Using a lucet is easy and brainlessly addictive. I'm really happy with my tiny tool. Next I'm thinking I might want to print out some needlebinding needles with the 3-D printer. You can only print two things out per month right now, which may be revised once they get a feel for what the demand will be like for the printer. I've also found already-made designs for spinning wheel bobbins. It's fun to think about applying this new tech to print out old tech tools!
Tuesday, February 24, 2015
A small rant about pricing artisan goods
I don't like it when people tell me I under-value my own work because I price it too low. They tell me, "A handspun, hand-dyed skein of yarn for under $20? Are you crazy? You should price it much higher!"
Oh, really? Should I price it in the high 20's? In the 30's? I've seen handspun priced in the $40 and even the $60 range. I even saw handspun priced in the $200 range,for one skein, and it wasn't any type of luxury fiber.
What would you pay?
Well here's the thing. Recently on a Facebook fiber arts group I belong to, a person asked the group at what price should she list her hand-crocheted cowl in her online shop. It was a beautiful creation with stunning colors. She said that the yarn had cost her $19. People threw out suggestions like price it three times the cost of materials, or they suggested she also calculate and be paid for her time as well, others threw out numbers: $50, $60, $75. When suggestions hit $100 I stopped reading. It was indeed a very lovely and colorful cowl, but $100? Would you pay $100 for a very lovely, colorful, hand-crocheted cowl?
She ended up listing it for $103.56 CAD (Canadian dollars), and thanked everyone for their help.
Okay. Let's go back to the yarn. Let's say that I had made that yarn (which I didn't, but this is to make a point). Let's say that I had made it from 'scratch', meaning I bought a raw fleece, washed it, combed it, spun it, and dyed it all by hand. And we're talking commercial acid wool dyes here, not the natural dyes that I grow in my garden or find in the wild and make. It takes several hours to wash a fleece. It takes a few hours to comb enough fiber for just one skein of yarn. It takes several hours to spin the yarn. It takes time to pick your colors and figure out how they will be placed on the yarn. (And by the way, all of the prep - everything that occurs after the fleece has dried from being washed - is yarn design. A lot of factors are taken into consideration when designing a yarn, and all of this knowledge comes from hours and hours of work).
So I have put all of this work into what has turned out to be a beautiful, colorful yarn. Now, at what price should it be listed? Do I calculate all of my time and make sure I'm compensated for it? Would this apply to naturally-dyed skeins, too, where I have cultivated plants from seeds sprouted indoors under grow lights, then planted them outside and cared for them throughout the growing season, putting in hours of weeding, watering, harvesting, etc., and then made the dyes myself? That's a lot of hours.
Let's say I do calculate my time, and give myself a fair wage. I'll even be conservative in my calculations. 2 hours to wash + 3 hours to comb + 4.5 hours to spin + 1.5 hours to dye = 11 hours. We can all argue over what a fair wage would be, but let's put it at minimum wage,$8.25 per hour. So my time was worth 11 hours x $8.25 per hour = $90.75.
Let's say materials (four ounces of my clean wool) cost $4. This is my cost for the fiber, plus wear and tear on equipment.
So my time plus materials = $94.75.
But I also have to figure in about 8% for all of the transaction fees I'll be paying; 8% of $94.75 is $7.26, which I will now add on to make the total = $102.01. I'll be generous and round it down to $102.
So I should list my unique, handspun, hand-dyed yarn at $102.00. Would you pay $102 for four ounces of handspun, hand-dyed yarn?
More importantly, would the maker of the lovely, colorful, hand-crocheted cowl pay $102 for my yarn so she could make more lovely, colorful, hand-crocheted cowls?
Let's imagine that she would. Now how much would her beautiful creation have to be priced at? Well her materials now cost $102 instead of $19, which is $83 more. Just add that to her current price and we come up with $186.56. Would you pay that much for a lovely, colorful, hand-crocheted cowl?
I'm not devaluing myself or my creations by pricing most of my handspun, hand-dyed yarns under $20. I'm living in the real world. I set my prices so that I make pretty much a set amount on each skein. It is an amount that I am happy with. I could probably set my prices a tad higher and I may in the future, but right now I like the idea of pricing my things affordably, as long as I get something out of it, too.
The reality is, I can't price yarn the way some artisans price their creations. If I did, no one would buy it. It may take just as much time, effort, knowledge and skill to make handspun, hand-dyed yarn as it does to make lots of other wonderful and beautiful things, but the bottom line is, ain't nobody gonna pay a lot for yarn.
Sunday, December 28, 2014
Spinning Cotton Straight From the Boll
For Christmas my husband gave me a couple of bundles of cotton stems from a florist. How exciting! I've spun prepared cotton, but I've never had it in boll form before. I've heard that it can be spun straight from the boll and the seeds can be picked out along the way, so I gave it a try.
Here is one of the bundles of cotton stems with bolls, below the bundle is one boll, the seeds from the boll I spun, and the resultant two-ply from the one boll I spun up:

It wasn't really very tricky to spin straight from the boll. the seeds are actually quite large and fairly easy to pick out along the way as you spin. There were about six seeds in the boll that I spun. I got about one yard of two-ply from the one boll:

And here is a tiny swatch I knitted up with the bit I spun:

How fun! I can't wait to spin the rest up and dye it and make it into something! I also got four ounces of dyed Malabrigo roving for Christmas - wow! I love Malabrigo yarn, but I didn't know they also sold roving! Crazy wonderful! I've already spun it up and it's drying after soaking to set the twist. I got about 444 yards of two-ply fingering out of it, and of course the colors are gorgeous.
Happy Spinning!
Wednesday, November 19, 2014
Wet-felted slippers
At the Great Lakes Fiber Show this past summer, I bought two bags of alpaca seconds (the part of the fleece that's not first quality). They cost about $3 per bag. I wanted to use the fiber for felting because alpaca tends to felt up really nice and thick.
After de-hairing and washing close to six ounces, I carded it into bats. I had about four ounces of black fiber and close to two ounces of brown fiber.
Initially, I wanted brown on the inside and black on the outside, but the black ended up pretty much taking over everything during the felting process, including the white wool accents I had placed around the edges of the openings and as design elements coming down off of the rims.
I felted around a resist (template) which I removed when the felt started to shrink and then continued felting the slippers around my feet for a custom fit.
Here are the slippers as they were drying over a heat vent, note how hairy they are:

Once they were dry, I shaved off the fuzzy, hairy-ness with a disposable razor. Below, the slipper on the left is still hairy, the slipper on the right has been shaved:

Below you can see both slippers, dry and shaved. I've ordered some soling material from this Etsy shop - www.shoeology.etsy.com - to put on the soles. I don't want to slip in my slippers!:

You can see how much the fiber shrinks in felting, the big white thing is the resist that I felted the fiber around at first. The slippers ended up much smaller:

Wednesday, November 5, 2014
Naturally Dyed, Handspun Yarn
Inspired by a yarn featured in Rebecca Burgess' book on natural dye plants called, Harvesting Color, I dyed up some wool with three of the more striking colors that can be had from natural dyes: steel-gray, burgundy and orange.
The wool is Corriedale, some that I processed from a raw fleece I had. The washed wool was combed with wool combs before dyeing. The steel-gray is from both staghorn and smooth sumac berries; the burgundy is from pokeberries; the orange is from tickseed (bidens) flowers. My husband helped me collect the sumac berries and the pokeberries, and I collected the tickseed flowers. In the picture below, you can see the three colors on the dyed wool after drying.:

I often line up my puffs of colored wool in the order I want to spin them:

Here is on of the three skeins of yarn I spun up from the dyed wool:

I'm making a scarf with two of the skeins. I looked through a lot of pattern ideas before I settled on a scarf. I then looked at a lot of scarf patterns before I finally decided I wanted a simple garter-stitch scarf:

I'll use the remaining skein to make either a pair of fingerless gloves or a pair of fingerless mitts. I expect that the pokeberry burgundy will fade to a dusty version of itself with time. I have a skein of yarn that I dyed with pokeberries several years ago and this year is the first time I've noticed that the fading has really picked up. The first year or so it remained vibrant, after that it retained a dusty sort of version of the color, and this year it is now officially fading, although still a beautiful color. I think, although I'm not positive, that the other colors will remain vibrant longer. I guess we'll see!
Wednesday, October 8, 2014
Dyeing with sumac berries
Rebecca Burgess's book, Harvesting Color, is one of my favorite dye books. Because of this book, I've added pokeberries, bidens flowers, and sumac berries to my list of favorite natural dye materials. Over the past few years, I've used pokeberries an bidens flowers to make dyes, but hadn't used sumac berries.
This year while flipping through her book, I noticed a beautiful yarn she made with wool dyed with these three things. It's a wonderful burgundy, orange, and dark steel-gray all spun up and plied together into a striking, colorful two-ply yarn. It has now become a quest to spin up a yarn with these colors. The orange came first, after gathering bidens flowers. The burgundy came next after gathering prodigious amounts of pokeberries. That left the steel-gray.
I had a few stalks of staghorn sumac berries in my store of dried dyestuffs, but I needed more. My husband and I found a nice patch of smooth sumac and helped ourselves to some of their berries. The result was that I had a nice potful of sumac berries for dye:

I mordanted my fiber (Corriedale wool) with alum and cream of tarter, but to get the nice steel-gray color from the berries, you need an iron after-bath. What I did instead was use untreated well water high in iron for the dyebath, and for good measure I scrounged my husband's tool area until I found a few rusty nails and a couple of neglected tools that had rust on them and threw them in the dyepot along with the berries. I was rewarded with a beautiful witch's brew of scrumptious, dark color:
After straining the dye, I plunked my wet, mordanted wool into the pot and let it brew for about 1 1/2 hours. Here is the fiber fresh out of the dyepot, before rinsing:

And here is the fiber after rinsing and drying; I love this color:
Here are the three colors that I'll be spinning up:
 |
| From left to right, combed Corriedale wool dyed with sumac berries, pokeberries and bidens flowers |
Wednesday, September 24, 2014
Retting Flax in an Inflatable Kiddie Pool

This year's flax crop is retting in an inflatable kiddie pool that I got on clearance this same time last year. Last year's crop retted nicely in it. The pool made it through a year of storage in the garage without sustaining any leaky holes, so here we go again!
I saved the seeds from last year's flax crop so that I wouldn't have to buy seeds this year. All sources I can find sell coated seeds - the coating contains nasty chemicals that will protect the growing flax from disease, but I'd rather not use it.
The seeds sprouted really well, but this year's crop didn't get as tall as last year's. It could be for several reasons. One big one of which was that I didn't weed as often as I should have and there was a lot of grass in there with the flax.
At any rate, it's been pulled, dried and rippled, and is now retting. I don't think I'll get the 800 yards of spun flax that I got last year, but I'm hoping I'll get at least 500 yards. We'll see.
Saturday, August 23, 2014
Dyeing with Box Elder Leaves
My neighbors had an enormous, beautiful box elder tree in their front yard. Recently, with heavy rains, a large limb came down. A large limb came down a year or so ago, too, onto their driveway. Unfortunately, there were several limbs that would do severe damage to their house if they came down, so today they had the whole tree taken down. They were very sad about it. With their permission, I asked the tree guys if I could gather some leaves and bark. I told my neighbor I would try to make dyes with them, dye some wool, and then make something for them with the dyed wool so that they could always remember their beautiful tree.
I filled my large dye pot with leaves and simmered/boiled them for an hour. For the first dip, I mordanted around 8 oz. of Corriedale wool. After straining the leaves out, I plopped the mordanted wool in and simmered for an hour. The water I used was distilled water that I purchased because my water has been funky lately (we have well water and our softener is on the fritz). Here are the leaves in the pot:

When I took the 8 oz. of wool out, it was more yellow than green, but I rinsed it in my tap water and it came out of the rinse more green than yellow. Don't know if that's because of my water or not. The dye left in the pot was much clearer and a bright, pretty yellow, so I mordanted 4 oz. more Corriedale and added it to the dye pot. After simmering for an hour, the wool was a pretty, light yellow. This time I rinsed with the distilled water and it remained the nice, light yellow.
Below you can see the fiber drying. The green on the left is the first dip, the yellow on the right is the second dip:

I mentioned several things that I could do with the dyed wool to my neighbor, such as spinning it into yarn and making something(s), like a hat or scarf or mittens, etc; or I could wet felt the fiber into a felted vessel like a decorative bowl. She said, "Oooo!," to the felted vessel idea, so that's what I'm planning on right now.
I still have bark. I'll let it soak for a few days before I try to make a dye with it. The only reference I've seen on the web to dyeing with box elder bark gave a tan color as a result. I'm soaking the bark in untreated well water that's really, really hard. I'm hoping the extra iron and other things will sadden the tan a bit toward a brown, if I get anything at all. We'll see what happens. If I get any color at all, I'll try to remember to take pics and post about it.
Wednesday, June 18, 2014
Using dried and frozen Japanese indigo leaves for dye
Last year at the end of the gardening season, before the first frost killed off my Japanese indigo crop, I harvested a bunch of stalks to save. I hung some to dry; I took the leaves off of some, bagged the leaves in a freezer ziplock, and stuck them in the freezer; and I took the leaves off of some, laid them out on a flat pan, put the pan in the freezer, and left them to not only freeze, but to dry out (freeze-dry).
About a month ago, I tried brewing up a Japanese indigo dye pot in the usual manner (like I would for fresh leaves), but I used some of the freeze-dried leaves. It didn't work out. I meant to toss all of my frozen and dried leaves but couldn't quite bring myself to do it.
I'm glad I didn't because I just came across the book, A Garden to Dye For, by Chris McLaughlin. In it there is a recipe for using dried Japanese indigo leaves in an ice-water preparation to dye silk. Yippee! Of course I tried it right away.
The recipe calls for 4 ounces of J. indigo leaves, half air-dried, half microwave-dried. These are blended up with ice-water in a blender, the mixture is strained through a cloth (like a flour sack towel) and a strainer, and then the pre-wetted silk is placed in the thick mixture for 10-20 minutes. This is supposed to yield a light, turquoise-like blue on the silk. I didn't have any microwave-dried leaves, but I used all of the dried and frozen leaves I did have on hand. They totaled about 3.5 ounces.
The author of the book left her silk scarf in the liquid for 40 minutes. I didn't have any scarves, but I have lots of silk hankies, so I used some of those. Although I did see the blue color on the hankies at about 10 minutes, I left them in for 40 minutes. I also tossed in a small knitted swatch of wool I had on hand. After soaking, the silk should be rinsed and left hanging to dry.
I rinsed my hankies, and although I caught glimpses of that pretty turquoise for a moment, what I ended up with in the end was green. I don't know if that's because I left the hankies soaking for too long, because of the chemistry of my water (well water, run through a softener), or because some of my leaves were frozen, but not dried. The color is pretty, nonetheless.
Here are the hankies soaking in the thick liquid:

And here they are after drying overnight. The turquoise ones on top are some hankies that were dyed in an actual J. indigo dyebath last summer. The little woolen swatch is to the right of those hankies, and the green hankies from last night's experiment are below those:

It's a nice color, especially on shiny silk, but not the pretty turquoise I was hoping for. I've used up all of my leaves from last year now, but fear not! I have another crop growing in the dye garden as we speak. I will, of course, repeat the experiment again in hopes of attaining that wonderful turquoise in the future from dried J. indigo leaves.
Thursday, May 29, 2014

Wednesday, April 23, 2014
A New Map for my book, Rose of Par Kluhnd, and trying a new experience with going KDP Select
Rose of Par Kluhnd has a new map at the front of the book. The original was my own, but the new one is professionally done and looks terrific! I'm so pleased with it:

The map was created for me by Anna-Dawn at adawndesigns.com.
It is already available in the eBook version exclusively at Amazon, and soon will be available in the print version, also available through Amazon. I'm so excited about this new map!
I am also trying a new thing. Thus far my books in electronic form are available pretty much through all eBook retailers, but for the next 90 days my book, Rose of Par Kuhnd: A Fairy Tale, will be available exclusively through Amazon.
Amazon has a program for authors called KDP Select. In order to participate in KDP Select, your eBook must only be available through Amazon. My sales numbers have been stagnant so I've decided to give KDP Select a try. I don't like the idea of my books not being available for every type of eReader, but if no one is buying them from all of those other retailers anyway, why not give KDP Select a try?
So for the next 90 days, we'll see what, if anything, happens with Rose of Par Kluhnd. After being enrolled in the program for 30 days, I can do some nifty promotions through the program - discounts, etc., so that will be fun to try in about a month.
It'd be nice to see something happening with those sales numbers!
Tuesday, April 15, 2014
Processing and spinning Qiviut
Qiviut is the warm, soft undercoat of the musk ox. It keeps the musk ox warm in its native habitat of the arctic regions in places such as Canada, Greenland, Sweden, Siberia, Norway, and Alaska. It is a rare fiber and expensive.
I recently purchased 1 ounce of raw qiviut fiber from the University of Alaska Fairbanks' Large Animal Research Station. You can watch how they comb the shed qiviut from their musk oxen here.
Below is the one ounce of raw qiviut that I bought:

The long hairs have to be pulled out by hand. They are soft, but stiffer and not as fine as the qiviut undercoat. What you want is just the wonderful, soft undercoat. Below is the same one ounce, now a bit lighter, after it's been dehaired:

I kept the hairs that I took out of the qiviut, carded them and spun them up. I got about 24 yards of yarn. It's very soft to the hand, but prickly up against the neck. Here it is with the unspun qiviut:

Below, I'm holding a segment of the unspun, dehaired qiviut fiber. I spun it right from these segments of the dehaired blanket without washing, carding or combing:

It spun up wonderfully, here is the singles on a bobbin:

And here is the two-ply yarn:

It is a wonderfully soft and light yarn with no prickles. I got approximately 84 yards, and, after washing, it weighed in at approximately 0.7 ounces. It reminds me very much of the paco-vicuna I've spun; it's got the same heavenly softness and cloud-like weight. And the same high price-tag. I used to think that qiviut was very much the same as yak, but it's not. Yak is also very soft and warm, but it's not as fine and cloud-like as qiviut. Yak is a lot more dense, but still a very nice, soft fiber, and a lot less expensive than qiviut.
I really like the qiviut, I only wish I could afford enough to make something like a sweater - we all can dream, can't we?
Friday, April 11, 2014
Processing, spinning and knitting milkweed fiber
The milkweed plant produces a fiber that can be used by spinners. Fibers from hemp, flax, dogbane, milkweed and nettle have been used for thousands of years to produce textiles, cordage, netting, etc.
I've been wanting to try my hand at getting fibers from milkweed, processing them, and spinning them. I finally had the time to give it a try, so I went to glean a few stalks from an area that I know had milkweed growing last summer.
I gathered around twenty or so stalks that had been sitting in situ after dying off last fall. If you gather milkweed and nettle in the early spring, after the dead stalks have been sitting out all winter, it saves you the trouble of retting.
The stalks have a pithy core, with the fiber and the 'bark surrounding it. At this stage, after sitting out in the elements, the stalks break easily and it's easy to dislodge the pithy core from the bark/fiber layer. There are several YouTube videos that show this process for nettles.
Below, you can see the core to the left, and the bark/fiber layer peeling off to the right. The fibers are shiny and white:

After peeling the outer layer off of all of my stalks, I had a small pile of fibery bark:

So here's the problem, how to release the wonderful, white, shiny fiber from the thin layer of bark? I don't know. I'm sure there is a way. It might involve breaking it in a manner similar to breaking flax. I do have a flax break, but I wasn't sure the milkweed would stand up to the flax break. I may try that next time. What I ended up doing was carding the bark/fiber. Most of the bark is broken up and falls away, but the fiber is also broken, and not all of the bark is released. It was heart breaking to break all of that wonderful, long shiny fiber up. I will research/experiment with other methods next time.
So here is what the carded milkweed fiber looks like in a rolag:

I ended up with about 0.7 ounces of carded fiber from those twenty some-odd stalks:

I split that up so that I could spin two bobbins and ply them together. The spinning was challenging, it's not an easy fiber to spin in this condition, but I got it done. Here is the two-ply on the wheel:

I ended up with about 17 yards of sport-weight, two-ply yarn:

I washed the yarn vigorously with hot water and soap. I know that linen yarn benefits from washing in hot water, and even boiling with washing soda (which I've done with my own linen yarn). I'm sure that this would clean up and lighten up even more with such treatment, but after just a couple of vigorous washings, and letting it dry, I wound it into a center-pull ball for knitting:

Like linen, it's a bit on the stiff side, but softens up with washings, and I'm sure with wear, too.
So I ended up knitting a little swatch, about 2.5" x 4" in size:

I'll probably fold it over, add a crocheted edge while binding two sides together, and keep the top open to make a small pouch to hold my stitch markers.

This was an interesting process. I hope to find out how to extract the fibers without breaking them all up with carding. As it is, I think this yarn is not very strong - certainly not nearly as strong as linen. Hopefully, if I can figure out how retain a nice length on the fibers, I can make a prettier, stronger, and finer yarn from milkweed in the future.
Okay, here is the finished pouch:

It's small, but a nice size to hold stitch markers:

From plant to pouch took about a day and a half. Looking forward to repeating with hopefully even better results in the future.
Subscribe to:
Posts (Atom)


