
Wednesday, December 12, 2012
I've got the Slytherin scarf started, hooray!
I finished the Gryffindor scarf and have begun the Slytherin one - ten points to me!!
Saturday, December 8, 2012
Aack! This scarf is going to kill me! - or - Knitting things from movies, books, and TV shows
My son asked if I could knit some scarves for him and his girlfriend for Christmas. Specifically, a Gryffindor scarf and a Slytherin scarf. There are a few different patterns out there, so I asked which type he wanted. He chose, I bought the yarn, and started knitting away. Scarves are usually pretty easy.
This one is easy, yes, but time consuming, and LONG. My husband is out of town for several days, and I thought this would give me lots of time to put into knitting. Gaaa! I think there's a spell on my needles, or something. I've been knitting, all told over the past few days, for HOURS AND HOURS and the scarf seems to grow only incrementally - soooo slowly. And it's only half way done. Gaaa! What was I thinking??
And notice the green and silver yarn in the corner? That's for the Slytherin scarf, yet to be cast-on. I say again, GAAA!
I've knitted things from movies and books and TV shows before, usually as gifts. Some have been specific requests, like the Jayne Cob hat I made for my son (from the TV show, Firefly). You can see him wearing it in this post - scroll down to the end.
I also made some fingerless mitts fashioned after the ones Johnny Depp wore in the movie, Sweeney Todd, for my daughter's boyfriend. He loves them and wants another pair because these are about to wear out (they are 2 or 3 years old by now and he wears them all the time in winter). The problem with that is I sort of cobbled the pattern together and customized it for his (large) hands, but now can't find my notes. So I have to go through the process of cobbling together and customizing all over to make new ones. Gaaa!
And here are some mittens I made from the excellent book, Code Name Verity, for a friend.
I would someday like to knit the fingerless mitts Hermione wears in The Deathly Hallows Part 1 for myself (click the image to see it larger):

And then, there are the Beowulf socks I intend to make for my son someday - they have the first page of Beowulf written on them. I made the yarn already, but the pattern is a bit daunting, so I'm nervous about starting.
So there is no end to the inspiration that can be found in literary, film, and television sources - and the requests that may come your way if you are a knitter. My only advice to you is, STAY AWAY FROM THESE BLEEDING SCARVES. If you must, knit one of the other styles that can be found. You'll be glad you did.
Friday, November 30, 2012
Maddie's Mittens from Code Name Verity
I recently read the excellent book, Code Name Verity, by Elizabeth Wein. It's set during WWII, and mentioned in the book are a pair of handknitted mittens which enable the wearer to free the fingers when needed. The author found the 1940's pattern for the mittens while doing research for the book. She included a link to the pattern (see this post for details).
Anyhoo, my book club read the book for this month's selection and I decided to knit the mittens as a gift for the person in the club whose birthday it was this month, seeing as it went along with the book we had just read.
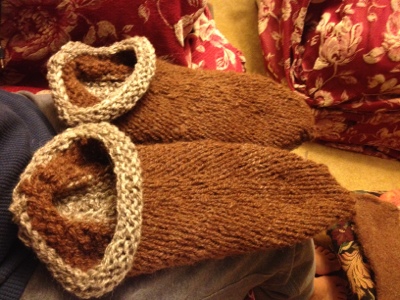
Here is the finished product. I knitted them with some of my handspun yarn - this happens to be Gotland lambswool. It was the only thing in the correct gauge that I had on hand which wasn't listed for sale already in my Etsy shop:

You can see that an upper flap is designed to tuck into a lower flap:

Here you can see the top flipped back:

On the hand:

And with the top flipped back to free the fingers:

I knitted them with a set of new needles that I recently got. You can see in the picture that they are square instead of round. The reviews said that they helped eleviate arthritis pain and carpal tunnel that can arise from knitting. I have both. These really did help with the arthritis - a lot! The carpal tunnel, only so-so. I think the shape helps the yarn stay on the needles better, so you're not gripping everything so tightly to keep from loosing stitches off the ends of the double points. The only drawback is that they are VERY pointy and sharp:

I had finished everything but the thumb of the left mitten by the time book club met last night. I showed my friend the mittens and told her I'd get them to her as soon as that thumb was finished, which I was able to do this morning.

By the way, Gotland lambswool is the same fiber that was used to make the Elvish cloaks in The Lord of the Rings movies. I believe that the cloaks were actually woven with a blend of Gotland and alpaca, and maybe something else, I can't remember. It's not a very soft wool, it's actually rather scratchy, but just fine for mittens and cloaks : )
Here is a book trailer for Code Name Verity :
Tuesday, November 27, 2012
Two things...
1. I'm having a sale in my Etsy shop, and two of my books are discounted with coupons over at Smashwords. Follow the links for more info.
2. I'm currently knitting the mittens mentioned in the excellent book Code Name Verity, by Elizabeth Wein, and referenced at the back of the book. Here is a link to the pattern at the V&A museum in England - scroll through the choices of 1940's knitting patterns until you come to "Mittens for Women."

2. I'm currently knitting the mittens mentioned in the excellent book Code Name Verity, by Elizabeth Wein, and referenced at the back of the book. Here is a link to the pattern at the V&A museum in England - scroll through the choices of 1940's knitting patterns until you come to "Mittens for Women."

Tuesday, November 13, 2012
For anyone out there who's interested...
My Etsy shop is back up and re-stocked. The shop had been in vacation mode since mid-summer, but it's back now. I only have one herbal product right now, but several hand spun yarns. More yarns will be added in the near future.
EDIT: 10% off in my shop now until Nov. 30th with coupon code SHOP10 at checkout!
That is all.
EDIT: 10% off in my shop now until Nov. 30th with coupon code SHOP10 at checkout!
That is all.
Sunday, November 11, 2012
Dyeing with lichen
On a walk this morning I found a small piece of lichen that had fallen off of a tree. Knowing that lichens can be used to dye with, with a wonderful, and surprising, range of colors, I pocketed it and brought it home.
At home, I plunked it in a small pot with about a cup of water (it was a small piece, about 2inches x 1 inch). I simmered it for about 10 or 15 minutes and it produced an orange/yellow color.
In the picture below is the piece of lichen after the simmering process. It had originally been pale, dusty green in color:

I added a slight pinch of alum and an even slighter pinch of cream of tartar to the color pot as mordant, and then tossed in a swatch of some type of white wool yarn that I had on hand. I simmered the 4" x 2" swatch for another 10 or 15 minutes, until most of the color had been taken up by the wool.
Below, you can see the dyed swatch next to the limp, wet, piece of lichen:

What a surprising color from a bit of lichen! I've never dyed with lichens before, but if the opportunity arises to gather lichens in larger amounts, I'll certainly plunk them into the dye pot.
Monday, October 22, 2012
Flax to linen experiment - breaking, scutching, and combing
Okay, here is a report on further progress in my growing flax for linen experiment. As previously posted, I grew some flax this past summer in order to see if I could turn it into spinnable fiber, and then into linen.
The next step in the process is breaking the retted flax to release the usable fibers. I let the retted flax dry out. My husband built me a flax break. You can find videos on YouTube that show people using antique flax breaks. Although I searched for a long time, I couldn't find any flax breaks, antique or otherwise, for sale anywhere (although I did find plans for building a good one), so I asked my husband to build me one (we didn't use the plans, we improvised).
Below are some pictures of me using my flax break to break the retted parts of the flax plant up in order to get to the durable flax fiber (click on any of the pictures to see them larger):

The arm of the break comes up, and then is smashed down onto the bundle of flax:

After breaking the flax, comes the scutching. You can look this up on YouTube, too. Basically, you're swiping away the bits of retted plant material that still cling to the fibers, and sort of fluffing the fibers up as well. In the picture below, you can see a bundle of retted flax on the table that hasn't been broken yet. In the foreground you can see me scutching some broken flax:

My scutching board is just that, simply a board. My scutching knife is made out of a wooden pizza paddle which is cut in half - it needs to be improved a bit, but it worked:

The fibers become a little cleaner and a little fluffier with scutching:

Next comes the combing. The combing is done with a flax hackle (there are a few different spellings). It seems that the only flax hackles you can get a hold of are antiques. After much searching, I found a very nice one, made in 1842, on eBay. I paid $70 and am very pleased with it. It's got a lot of nasty, sharp teeth, is still very sturdy, and works really well.
The flax is pulled through the teeth to further clean and straighten the fibers:

Shorter fibers are left behind in the hackle, along with any remaining bits of retted plant material:

Lash on and pull through:

Repeat until the fibers are looking nice and smooth:

You can find YouTube videos showing this process, too. You can see below that the fibers are looking much nicer:

What's left behind in the teeth of the hackle is called tow flax. This can be used, too, as stuffing, or to make ropes or rougher cloth:

And here is some combed flax, ready for spinning:

Percentage-wise, you get much more tow flax than nice, long, spinnable flax. Only about 10% of the flax plant results on fiber, 7% of that is tow flax, and the remaining 3% is the nice, long spinnable fiber that will make nice linen.
Here is the tow flax I've collected so far:

I'm a tiny bit disappointed with the quality of my flax fiber. There are lots of things that may be in play here. My growing flax had to struggle through drought conditions, although I did try to keep it moist. My soil wasn't the best - although I did add manure, lime, and alfalfa (for nitrogen), I'm sure it wasn't enough. I'm not sure if I pulled it at the right time - timing of the harvest can affect the quality. And I'm not sure if I retted it for long enough, because it seems like it was hard to get the retted parts off of the desired fibers - but this could also be a factor of my break not being up to par with the flax breaks of yore, not to mention my scutching knife.
The next step will be spinning the fiber. I still have about half of my flax to break, scutch and comb, so it will be a while yet. Whew, this is a lot of work, but I'm have lots of fun and learning a lot.
More posts on the great flax experiment to come!
Thursday, October 18, 2012
Knitted and felted clogs
Over the past few days I've been working on a pair of knitted and felted clogs. When you knit something for felting, it has to be made BIG because it shrinks during the felting process.
So here are what the knitted clogs looked like when I had finished knitting them:
They were huge!:

But I wasn't worried. I've felted things before. So I tossed my huge, floppy, knitted clogs into the wash. It took maybe just under an hour for them to reach the right size - you have to keep checking on them every 5-10 minutes to keep an eye on how they're felting, and to catch them when they're the right fit.
You can see that they are now the right size. They're stuffed with plastic bags so that they keep their shape while drying:

They can be worn like this, but I'm going to sew leather slipper soles to them so they won't be slippery, and for extra wear. I'm really happy with them:

The brown tops were knitted with alpaca yarn, and the gray soles and rims were knitted with a natural gray/brown Romney wool.
The alpaca yarn was from one of the first raw fleeces that I ever washed and processed into yarn. The Romney wool was spun from some roving that I purchased at a fiber festival and knew that someday I would make slippers with.
I hope these are as comfy as they look. My current pair of felted slippers are a few years old and need to retire. These are the replacements.
Wednesday, October 17, 2012
Why, "Binders full of women," is offensive
There are some aspects of language which convey a mindset.
Take, for example, the word, nigger.
A white person who uses this word can be perceived as having a certain mindset
toward people of color. Evocative of a time when whites thought themselves
above blacks, better than blacks, disdainful of blacks, and all of the other
prejudices one thinks of when one hears the word, a person who makes use of
this word is perceived of as not having left this thinking behind to embrace a
new era, but locked in an offensive past.
For the same reason, when
a man refers to his, “binders full of women,” as Mitt Romney did in last night's debate, it is a telling phrase which reveals
not the forward-thinking mindset of a person enlightened with the concepts of
equality, but a mind which thinks of women as objects in need of handling,
mollifying, quantifying, and being subject to ownership. It is not a slip of
the tongue; it is a revealing peek into the psyche of the speaker.This type of thing should be erased from the language, as should words like, “Man,”and, “Mankind.” "Humans,” and, “Humankind,” are more enlightened terms. And phrases such as , “our women,” when a man refers to the female members of a group to which he belongs, are also offensive. A better phrasing in this instance would be, “the women of (insert club, group, or organization).” Of course, it is hard to change one’s speech when one is stuck in a certain mindset.
Language can be revealing.
Wednesday, October 10, 2012
Dyeing with walnut hulls
A little over a week ago I posted about hulling walnuts, getting ready to dye with the hulls. After letting the four pounds of hulls soak in in a large, covered bucket of water for over a week, I got down to the dyeing part today.
The water was a bit frothy, which is fine. I read that the fermenting of the hulls helps deepen the brown color. I poured all of the contents of the bucket into my large dye pot and set it on the stove top:

I boiled the concoction for about an hour. The froth eventually calms down and the hulls sink. At that point the mixture can boil without being watched as carefully - at the frothy stage I was afraid it would boil over, which I did not want to happen.
After the hour-long boil, I strained the hulls out with a cheesecloth-lined strainer. There's a lot of sludgy gunk that I didn't want on my fiber and the cheesecloth filtered it out of the dye bath. Here are some of the hulls and sludge in the strainer:

I had about 4 ounces of polwarth roving to dye. No mordant is needed with this dye, so I added the clean, pre-soaked roving to the pot and let it stew at a temp. between 160 and 180 degrees F for an hour:

Here is the fiber fresh out of the dye pot before rinsing:

And here it is after rinsing:

It's now hanging to dry. The walnut hulls produced a very nice brown color:

The recipe I had said that you could let the fiber stew for 60 to 90 minutes, and then the heat could be turned off and the fiber left in the pot overnight to intensify the color. I was happy with the color I got with the 60 minute stew and taking it out of the pot right away, in fact, I almost wish it were a tad lighter. But the color is extremely nice and I'm looking forward to spinning it up!
Tuesday, October 9, 2012
A little kimono sweater!
A few months ago I spun this hand-dyed roving into a two-ply yarn with my drop spindles:

And recently I came across a cute little pattern for an infant kimono-style sweater. I thought I could use this yarn to make a colorful little gift for a baby girl that my sister-in-law is expecting soon.
So, over the past few days I've been knitting away. It was a fast knit, and this morning I sewed on the buttons:

Now I just have to wait for the baby girl to come into the world and send it off to her! I'm always so happy when a project is finished : )
Tuesday, October 2, 2012

Monday, October 1, 2012
Hulling walnuts for dye
I've been thinking about using walnut hulls to dye with because I recently saw a picture of a gorgeous brown gotten from them. I happened to drive by a house the other day which had a walnut tree in the yard close to the street. There were lots of nuts-in-the-hull lying about. I returned later with a bag and knocked on the door to ask permission to collect some of the nuts. No one was home, so I collected only what had fallen into the street.
I took them home and hulled the nuts, readying them for the dye process. I used a paring knife to slice into the hulls:

Slicing into the hulls is easy to do. Note that I'm wearing gloves. The hulls are juicy and full of tannins which will dry out your skin and turn it yellow/brown. The gloves are leather, but even so, some of the fingertips became soaked with juice and the fingertips underneath are now stained (I hope it doesn't last too long, but it looks very durable, even after showering):

Most of the hull sections could merely be pulled off without much effort at all. Occasionally I had to coax some off with the knife:

Here are a bunch of hulled nuts. If I wanted to eat them, I'd let them dry out until I could brush the remaining hull stuff off, and then I'd have walnuts in the shell. Instead, I spread these around my yard in strategic locations, hoping that squirrels will find them:

Here are some of the hulls in a bag:

After hulling all of the nuts, I had four pounds of hulls. I think this will dye about three ounces of fiber or so. I've placed the hulls in a large bucket, covered them with water until they float, and put a loose lid over it. These will sit for a while. One of my books says to let it all sit for 24 hours. Another book says to let it sit for two to three weeks, giving the hulls time to ferment in order to deepen the color. I'll see how it goes, but I'm thinking more like a one-to-two-week period.
I'll post more when I do the actual dyeing.
Wednesday, September 26, 2012
Continuing progress in my growing flax for linen experiment
My flax-to-linen experiment continues. A few posts ago, I wrote about pulling the flax I grew this summer in a 5x10 ft. plot. I let the bundles dry for about two weeks:

When they were dry, I combed the seed pods off with combs I bought at the pet store which are really for dogs. Once the pods were off, over a few days, I mashed them up to release the seeds and winnowed the mess on windy days to come up with about two ounces of flax seeds.
It's probably a poor haul, but I think the drought affected productivity. I won't plant these next year, I'll order more for that purpose. These I'll sprinkle in muffins, etc. It's enough for a few batches of muffins, at least:

After removing the seed pods, I put the bundles of flax in a large plastic container, weighted them down with old paving bricks, and added water. I let them stew like this for just over a week. This is called retting the flax, which basically means getting the outer parts of the plant into a nice, rotted condition so that you can access the stronger flax fibers:

After the retting was done, I dumped the water out. Wow! What a smell!!
I rinsed each bundle with the hose, hoping against hope to rinse away some of that stench, and I now have all of the bundles laid out to dry:

Once they're dry, I can move on to breaking (breaking away the dried, rotted parts), scutching (swiping away the dried rotted parts that are still clinging to the flax fibers), and combing (with a flax hackle) the flax fibers so that they can be spun. More on all of this in future flax-to-linen posts!
Friday, September 21, 2012
Dyeing with tickseed flowers and marigolds
Dyeing with tickseed flowers today. The flowers are yellow, but they make a pretty orange dye:

Here is some superwash merino roving in the dye pot:

Here is the roving out of the dye pot and hung up to dry, I can't get over that shade of orange:

Below is a wider shot of everything that's hanging to dry. The greens are from yesterday's dyeing.
The dark green on the right is superwash Bluefaced Leicester wool that had been dyed blue with Japanese indigo about a month or so ago, and then overdyed yesterday with a yellow dye made from marigolds.
The two olive greens are two sections of polwarth roving which I had wanted to dye yellow in the marigold dye pot. However, I wasn't thinking and put them in with the blue roving when dyeing. Apparently some of the indigo must have bled off of the BFL roving and got picked up by the polwarth in the yellow dye bath. The result is the olive green you see. Not my favorite, and not the beautiful yellow I was hoping for, but I will find a use for it:

And here is a picture of Japanese indigo blooming in my garden, such a pretty color!:

Subscribe to:
Posts (Atom)


